
Introduction
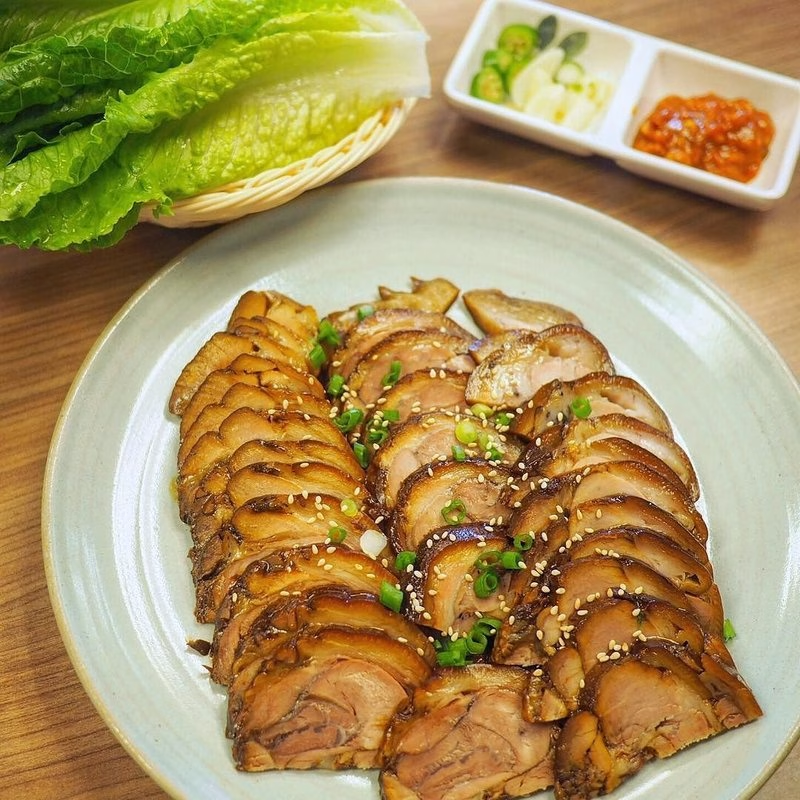
Dweji Jokbal (Pork Hock) is not just a dish; it’s a cultural phenomenon that’s woven into the fabric of Korean cuisine. Imagine juicy, tender pork hock, simmered to perfection in a rich, flavorful broth—a truly indulgent experience! This beloved Korean specialty is known for its melt-in-your-mouth texture and savory, slightly sweet flavor profile, making it a favorite among food lovers. Traditionally served as a late-night snack or during festive occasions, Dweji Jokbal offers a unique taste of Korean heritage.
In this article, you’ll learn everything you need to make authentic Dweji Jokbal (Pork Hock) at home. From the essential ingredients and step-by-step cooking instructions to useful tips and nutritional breakdowns, we’ve got you covered. Whether you’re a seasoned chef or a cooking novice, get ready to embrace the wonderful flavors of Dweji Jokbal (Pork Hock) right in your kitchen!
Ingredients
Here’s what you’ll need to create this mouthwatering Dweji Jokbal (Pork Hock). Each ingredient plays a vital role in ensuring the dish shines with authentic Korean flavors.
| Ingredient | Measurement | Description |
|---|---|---|
| Pork hock | 1 kg | A succulent cut that provides a rich, tender mouthfeel; the star of Dweji Jokbal. |
| Water | 3 liters | Used for boiling the pork hock to achieve the perfect tenderness. |
| Garlic | 10 cloves | Fresh garlic enhances the aroma and depth of flavor in Dweji Jokbal (Pork Hock). |
| Ginger | 1 piece (30g) | Ginger adds a fragrant warmth that complements the rich pork flavor. |
| Soy sauce | ½ cup | The key ingredient that provides umami, color, and depth to the broth. |
| Honey | 3 tablespoons | Brings a subtle sweetness that balances the savory notes beautifully. |
| Korean chili flakes (gochugaru) | 2 tablespoons | Adds spice and flavor, making your Dweji Jokbal (Pork Hock) unforgettable. |
| Green onions | 2 stalks | For garnish, offering a fresh crunch that brightens up your dish. |
| Sesame oil | 1 tablespoon | Enhances the flavor profile with its rich, nutty aroma. |
Step-by-Step Instructions
Ready to dive into cooking Dweji Jokbal (Pork Hock)? Here’s how you can do it in just a few simple steps:
Step 1: Prepare the Ingredients
Start by gathering all the ingredients listed above. Rinse the pork hock under cold water to remove any impurities. Chop the garlic and ginger, and slice the green onions. Getting everything prepped makes the cooking process smooth and enjoyable, ensuring you have authentic Dweji Jokbal (Pork Hock) in no time.
Step 2: Boil the Pork Hock
In a large pot, bring 3 liters of water to a boil. Add the pork hock, ginger, and half of the garlic. Boil it for about 20 minutes; this initial boil helps remove any unwanted flavors and tenderizes the meat further. After boiling, drain the pot and rinse the pork hock under cold water.
Step 3: Simmer with Flavor
Return the cleaned pork hock to the pot and add 3 liters of fresh water, soy sauce, honey, the remaining garlic, and Korean chili flakes. Bring it to a boil again, then reduce to a simmer. Cover the pot and let it simmer for about 2 hours or until the meat is fork-tender. This slow-cooking method allows all the flavors to meld beautifully, creating a heavenly Dweji Jokbal (Pork Hock).
Step 4: Serve and Enjoy
Once your pork hock is tender, carefully remove it from the pot and let it rest for a few minutes. Slice it into thick pieces and serve it warm, garnished with sliced green onions and a drizzle of sesame oil. Enjoy your Dweji Jokbal (Pork Hock) with a side of pickled vegetables or spicy dipping sauce for the ultimate experience.
Pro Tips
1. **Use High-Quality Pork**: Choose a fresh, flavorful pork hock for the best results. Quality meat makes a noticeable difference in taste.
2. **Don’t Rush the Simmering**: Allow the pork hock to simmer low and slow. This is key for achieving that tender texture that melts in your mouth.
3. **Adjust Spice Levels**: If you prefer a milder Dweji Jokbal (Pork Hock), you can reduce the amount of gochugaru. Feel free to adjust according to your spice tolerance.
4. **Make it Ahead**: Dweji Jokbal (Pork Hock) actually tastes better the next day. Consider making it a day ahead and refrigerating to let the flavors deepen.
5. **Pair with Soju**: Dweji Jokbal (Pork Hock) is often enjoyed with a glass of cold soju. The pairing enhances the experience!
Nutritional Information
Understanding what you eat is important. Here’s a breakdown of the nutritional content for one serving of Dweji Jokbal (Pork Hock):
| Nutrient | Per Serving |
|---|---|
| Calories | 350 |
| Protein | 29g |
| Carbohydrates | 12g |
| Saturated Fats | 9g |
| Fiber | 0g |
| Cholesterol | 50mg |
| Sugars | 5g |
| Total Fat | 24g |
FAQs
What is the best way to store Dweji Jokbal (Pork Hock)?
You can store leftover Dweji Jokbal (Pork Hock) in an airtight container in the refrigerator for up to three days. Reheat gently before serving.
Can Dweji Jokbal (Pork Hock) be made vegan or gluten-free?
While traditional Dweji Jokbal (Pork Hock) relies on pork, you can create a vegan version using jackfruit and a soy sauce replacement for a gluten-free option.
What are the best side dishes to serve with Dweji Jokbal (Pork Hock)?
This dish pairs perfectly with pickled vegetables, steamed rice, or even a refreshing salad to cut through the richness.
How long does it take to prepare Dweji Jokbal (Pork Hock)?
The total cooking time is about 2.5 to 3 hours, including prep time and simmering. It’s worth every minute for that incredible flavor!
Can I freeze Dweji Jokbal (Pork Hock) for later?
Yes! You can freeze cooked Dweji Jokbal (Pork Hock) in an airtight container for up to two months. Just make sure to let it cool completely before freezing.
Dweji Jokbal (Pork Hock) is a delicious and hearty dish that beautifully captures the essence of Korean cooking. With the right ingredients and a bit of patience, you can recreate this culinary masterpiece in your own kitchen. So, gather your ingredients, roll up your sleeves, and get cooking!
Have you tried this Dweji Jokbal (Pork Hock) recipe? Let us know your experience in the comments! We’d love to hear your thoughts and any personal tweaks you made. Happy cooking!