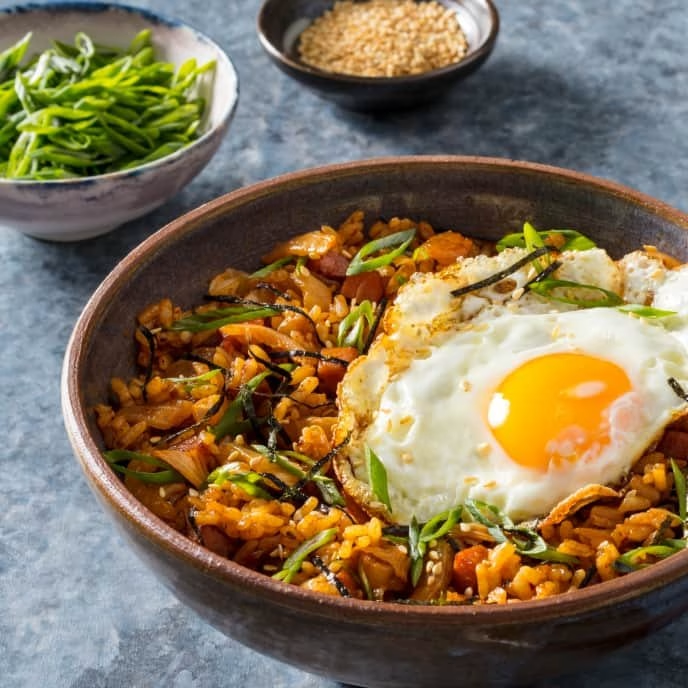
Are you ready to dive into the world of Kimchi Bokkeumbap (Kimchi Fried Rice)? This dish is not just a meal; it’s a vibrant explosion of flavors that represents the heart of Korean cuisine. A delightful combination of spicy, savory, and slightly tangy, Kimchi Bokkeumbap has become a beloved staple, adored not only for its unique taste but also for its ability to repurpose leftover rice and other ingredients. With its roots deeply embedded in Korean culture, this fried rice dish is often a go-to comfort food, and now, you can learn how to make it right at home!
In this article, we will walk through the essential Kimchi Bokkeumbap (Kimchi Fried Rice) ingredients, provide a step-by-step guide on how to make Kimchi Bokkeumbap (Kimchi Fried Rice) at home, and share some variations and tips to customize this dish to your liking. It’s going to be a delicious journey!
Ingredients
| Ingredient | Measurement | Description |
|---|---|---|
| Cooked Rice | 2 cups | Day-old rice works best for Kimchi Bokkeumbap (Kimchi Fried Rice) since it’s drier and won’t clump together. |
| Kimchi | 1 cup, chopped | This fermented cabbage dish adds a bold flavor and is the star of the show in Kimchi Bokkeumbap (Kimchi Fried Rice). |
| Vegetable Oil | 2 tablespoons | For frying, vegetable oil ensures high smoke point, allowing your rice to fry up nicely. |
| Onion | 1 small, diced | Sweet and aromatic, onions form the base of flavors in this dish. |
| Garlic | 2 cloves, minced | Fresh garlic enhances the aroma and depth of flavor in Kimchi Bokkeumbap (Kimchi Fried Rice). |
| Green Onions | 2, sliced | Adding freshness and color, green onions are perfect for garnish. |
| Eggs | 2, beaten | Eggs add richness and texture to the dish. |
| Soy Sauce | 1 tablespoon | This Kimchi Bokkeumbap (Kimchi Fried Rice) sauce enriches the flavor profile. |
| Sesame Oil | 1 teaspoon | A drizzle of sesame oil adds a nutty aroma that elevates the dish. |
| Salt & Pepper | To taste | Essential for seasoning to your preference. |
Step-by-Step Instructions
- Step 1: Prepare the Ingredients – Gather all your ingredients. Chop the kimchi, dice the onion, and mince the garlic. It’s essential to have everything ready because stir-frying goes quickly!
- Step 2: Heat the Pan – In a large pan or wok, heat the vegetable oil over medium heat. Once it shimmers, add the onions and sauté until they become soft and translucent, about 3-4 minutes. This forms the aromatic base for your Kimchi Bokkeumbap (Kimchi Fried Rice).
- Step 3: Add Garlic and Kimchi – Toss in the minced garlic and stir for about 30 seconds until fragrant. Then, add the chopped kimchi, stirring well to combine and cook for 2-3 minutes. This is where the magic happens!
- Step 4: Stir in Cooked Rice – Add the cooked rice to the pan, breaking up any large clumps. Stir everything together, ensuring the rice is coated with the kimchi and onion mixture. This step really brings out the flavors of the Kimchi Bokkeumbap (Kimchi Fried Rice).
- Step 5: Season It Up – Pour in the soy sauce and sesame oil, mixing well. Taste and adjust seasoning with salt and pepper as needed. This is your opportunity to make it just right for you!
- Step 6: Add the Eggs – Create a small space in the pan, pour in the beaten eggs, and scramble them until just set. Once done, mix the eggs through the rice for added creaminess.
- Step 7: Final Touches – Sprinkle in the sliced green onions and give it a final stir. Your Kimchi Bokkeumbap (Kimchi Fried Rice) is almost ready!
- Step 8: Serve and Enjoy – Transfer the fried rice to a serving plate. Enjoy it hot, topped with additional green onions or a drizzle of sesame oil for extra flavor!
Pro Tips
- Use **day-old rice** for the best texture. Freshly cooked rice can be too sticky and clump together.
- Feel free to toss in **leftover meats** or vegetables to enhance the dish. Chicken, pork, or tofu works great!
- Adjust the **kimchi** based on your spice tolerance. If you love spice, opt for a punchier kimchi.
- A squeeze of lemon or lime juice before serving can brighten up the flavors tremendously!
- For a vegan version, simply omit the eggs and you can replace them with scrambled tofu.
Nutritional Information
| Nutrient | Per Serving |
|---|---|
| Calories | 380 |
| Protein | 10g |
| Carbohydrates | 56g |
| Saturated Fats | 2g |
| Fiber | 3g |
| Cholesterol | 70mg |
| Sugars | 1g |
| Total Fat | 14g |
FAQs
What is the best way to store Kimchi Bokkeumbap (Kimchi Fried Rice)?
Store in an airtight container in the fridge for up to 3 days. Reheat in a skillet for the best flavor.
Can Kimchi Bokkeumbap (Kimchi Fried Rice) be made vegan or gluten-free?
Absolutely! Just replace the eggs with tofu and use gluten-free soy sauce if needed.
What are the best side dishes to serve with Kimchi Bokkeumbap (Kimchi Fried Rice)?
Pair with a simple cucumber salad or some pickled vegetables to complement the spicy flavors.
How long does it take to prepare Kimchi Bokkeumbap (Kimchi Fried Rice)?
The total time is about 20-30 minutes, especially if you have pre-cooked rice!
Can I freeze Kimchi Bokkeumbap (Kimchi Fried Rice) for later?
Yes, you can freeze it! Just ensure it’s in a cool, airtight container, and it should last for up to a month.
What type of kimchi is best for Bokkeumbap?
Spicy napa cabbage kimchi is the most traditional choice, but you can also use radish kimchi or any fermented vegetable.
Can I add protein to Kimchi Bokkeumbap (Kimchi Fried Rice)?
Certainly! Adding leftover chicken, beef, or even shrimp can make it heartier and more nutritious.
Is Kimchi Bokkeumbap (Kimchi Fried Rice) spicy?
It can be spicy depending on the type of kimchi used. Feel free to adjust the spiciness level to your taste!
And there you have it! Making your own Kimchi Bokkeumbap (Kimchi Fried Rice) is not just simple; it’s an adventure in flavors. From the tangy punch of kimchi to the comforting embrace of rice, this dish is sure to become a family favorite in no time. So, roll up your sleeves, fire up that pan, and experience the joy of creating Korean comfort food at home!
Did you try this Kimchi Bokkeumbap (Kimchi Fried Rice) recipe? We’d love to hear how it turned out for you in the comments below!


